Table of Contents
Play As Sleeper
TO DO LIST: (You can help expand this page too.)
Complete Documentation of units as much as the author allows
Self explanatory images
Information regarding the customizability of each unit
Advanced instructions of adding custom-upgrades for the factory
->Overview<-
A game mode that branches off the popular “Play As Creep”.
This time, you take control of a creeper-infused Rift Lab.
Construct the corrupted counter-parts of the rift-lab, with considerably altered functions.
Will you expand rapidly with the Corrupted Towers, or will you decimate every colonized-planet you come across with a wide variety of weapons?
Maybe you'll have your own way of defeating the humans!
Game Mode is M-Verse compatible.
Both Co-Op and PVP! (PvP is still unbalanced.)
CAUTION:
Drinking sleeping pills before playing such gamemode is ill-advised.
-STRUCTURES-
These hold the main infrastructure of the sleeper's system and territory.
Without these, you're only bringing guns without bullets.
 Absolutely, ALL structures require creep, then a sleeper mite going to said structure. If corresponding sleeper mite was killed, corresponding construction will be botched.
Core Structures
The Sleeper Lab
This is the only core of the sleeper in a mission.
This is where you are also managing your structures from; Creating Sleeper Mites that are required for construction.
If this gets destroyed in some way, most likely from fighting against an automated colonizer, you are still able to continue the mission… if you still have the guts that the Automated colonizer had already surrounded your destination.
 The Sleeper Lab will be on cool-down when it gets destroyed.
Fear not as every sleeper structure will not be destroyed unlike the AI-Version of sleeper.
Feel free to move it into the front lines.
Though, You won't be able to build anything when it's dead.
The Factory
Provide EXTENSIVE upgrades for the Sleeper Lab, in this case, the player.
Selecting the factory will pop up a In-Game UI, clicking the arrows on the corners will switch pages.
Buying upgrades will fixedly increase their costs. I.E. Creep Cap for 100 Redon, now 150 Redon, and so on.
Only gets Resources from Resource Taps, but can also get resources from destroying enemy units.
 Highly configurable Editor-Settings.
You can add custom upgrades, assuming you're experienced with 4rpl.
Documentation about how-to-do it will be done in the future.
Infrastructures
Units that hold the integrity of the territory of the sleeper. Or serve as tools of another unit.
C-Tower
These are the primary structures that produce creep.
You gain more towers as you get more territory, though it may differ from each colony.
The towers will connect to each other.
Though not needed to be connected to each other, we still recommend doing that.
If there are more than 6 Towers are connected to a Tower, the latter tower will be “strained”.
When a tower is strained, they will considerably produce less creep, and eventually stop working.
This is indicated if connections originating from the said strained tower is ORANGE or RED.
Equally Spacing out each tower is key here. The connections are the way to go.
 The Sleeper Lab will automatically expand the tower infrastructure, however, it may occasionally get stuck. Placing towers your self will fix this.
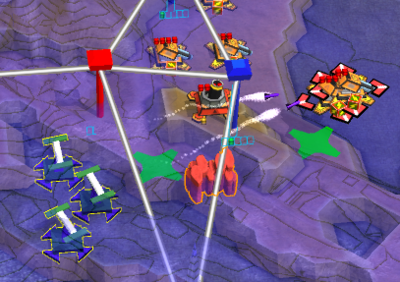
First Image shows the connections of Towers are nominal.
Second Image shows the connections are being strained and creep production is reduced.
 ————–
————–
RESOURCE-TAP
These are your primary way of getting resources that are required for upgrades.
These can only be place on top of resources, indicated by their respective colored beams above them.
The beams will also be higher than creep, ensuring you aren't blinded by how dark the creep is.
Resource Taps directly siphons resources that it is placed on.
The siphon rate is unaffected by Rift Lab's ERN Port buff “Miner Efficiency”. I.E 1.0 Redon rate, but if Reso-Tap is present, only 0.5 per second for the player.
Bluite Taps produce creep instead, 100 x [Bluite Crystal Rate] = [Creep] Per Second
 <-Redon Tap—–Greenar Tap->
 <-Bluite Tap
C-Terp
These are the only structures that could create Mesh.
They create mesh towards their set target. By Default it creates mesh towards Rift-Lab.
For now, key usage here is bunching them in one area.
Controls are self-explanatory.
 Do not place terps too far from their self-created mesh location, instead move them towards it.
Otherwise, they would not mesh, requiring to re-build them to be use-able again or move them towards their created mesh.
Potential Reason: FloodFill error.
Arsenal (Weapons)
The main offense is the best defense; vice versa when there's a automated colonizer in a mission.
Without these, you're only bringing bullets without being able to use them.
 All move-able units are targeted by missiles.
C-Cannon
The Corrupted Cannon is your first go-to offensive approach.
About the same range as it's human counterpart.
Pierces shields.
Consumes creep from under it self and then launches it under the enemy units.
C-Mortar
The Corrupted Mortar is the second-to none when it comes to providing devastating behind-frontline approach.
Perhaps larger range than it's human counterpart. But it is, noticeably more hurtful than them.
Consumes more creep from under it self then launches arching shells behind enemy lines.
 Blocked by shields; won't deposit creep.
C-Sprayer
The Corrupted Sprayer is the, obviously, corrupted variant of the Human Sprayer.
Consumes more creep than the C-Cannon, but tad-bit less than the C-Mortar.
Creates Crimson in two modes: (Automatic)
Idle Mode:
Creates crimson stationarily like a Vanilla-Crystal.
Active Mode:
Shoots at the nearest Human Structure whilst creating crimson under that structure.
TL;DR, Creep-Reinforcement version of C-Cannon. Crimsonates less than Crystal.
 Crimsonating creep to fight against AC does nothing.
 Image of C-Sprayer Active.
C-Missile Launcher
The Corrupted Missile Launcher is your only Anti Air! And its quite good at it's job too!
Only targets moving units, which are obviously the bombers, and if fighting against an automated colonizer, moving units.
Consumes considerable creep from under it self. And their firerate scales with how deep they are in creep.
Deals noticeable damage to enemy units.
If target dies before the missiles it-self reached said target, they will go hay wire and land on the ground, depositing creep.
 Fragile against enemy missiles while on-the-move.
Aerial Hangars
In the future, Sleeper Air Units may be possible and may get added, but for now, it'll be in the bucket list.
Special Structures
Units that has their own specific usage.
They could help construct units, be bullet sponges for the frontliners, or be a devastating artillery-class mega-structures.
C-M-Rift
The Corrupted Micro-Rift is one of the most important structures when it comes to constructing on different areas, especially if the mission partaking in is very big, or complex terrain that the sleeper mites are too slow to climb up on.
Sleeper Mites will Go to the nearest C-M-Rift if the distance between the Sleeper Lab and Target Construction is too far, and then comes out of the nearest C-M-Rift to the Target Construction.
These also sends creep to other C-M-Rifts, meaning you could potentially start a remote-offense approach in the back lines of the enemy!
Also used by resources from killing enemies, saving tad-bit time.
C-Shield
The Corrupted Shield specializes in being, literally, the shield. Able to soak up alot of damage, heavy resistance against missiles.
This structure will not disappoint you! You can get it to create artificial waves by moving the structure around from time-to-time. You can use multiple of these to distract a location that is full of missile launcher that you're approaching.
Or, use them to hold off approaching-AC.
Melts Quickly to AC. Be wary around sprayers when approaching with this unit.
C-Bertha
The C-Bertha is one of the utmost powerful artillery class weapons you can have!
It has two available targeting modes, them being AUTO and MANUAL.
Auto will target the nearest structure, not checking if there's a shield that's covering the target.
Manual lets you do precise aiming, allowing you to absolutely DECIMATE strategic locations, like miners or enemy artillery-class emplacements, instead of blindly shooting nearest targets.
The Shells are blocked by enemy shield-related structures.
If shields were hit, their health would drop by lower-than half of their maximum health.
If totems are hit instead, they are unaffected as totems are lore-accurately indestructible.
If the C-Bertha's Shot lands successfully, it would not deposit creep, however, it would devastate the impacted area, ruining terrain. This will give an edge for you, and not for the other, preventing the former from building/constructing units on that area unless they terp that area back to normal.
If the mission does not contain automated colonizer, you'll need to absolutely ruin the terrain around the area of impact to be much of difference.


