This is an old revision of the document!
Table of Contents
PRPL A-Z Tutorial
This is a full “A-Z” tutorial on how to write PRPL scripts. PRPL scripts can be attached to PRPL cores in the editor, and they are used to create custom units. This tutorial assumes no prior knowledge in programming or making scripts or even maps for any of the Knuckle Cracker games.
I will try to show pictures where illustration could be welcomed, but will also just exaplin with text at other places to not clutter the tutorial too much. Aslo I'll leave a link to the PRPL reference here since I'm sure someone will find that usefull.
Navigation:
<html></html>
Making your first script
Before we get to what to write into script, we need to know how to make one at all, so our first goal will be a simple script that just writes “Hello world!”. First, let's create a new map in the Mission Editor.
(This may look like a lot of work, but some of it is “set it once and forget it”, like setting up notepad++ as your editor, and other things will become easier to do as you get used to them, so don't be discouraged.)
Create a script and add it to a core
Next, let's create a new PRPL core, a new script, and attach the new script to the core. In general you can have any number of cores and any number of scripts. Moreover, multiple scripts can be attached to the same core, even the same script multiple times to the same core! For now however, we will just create one core with one script attached.
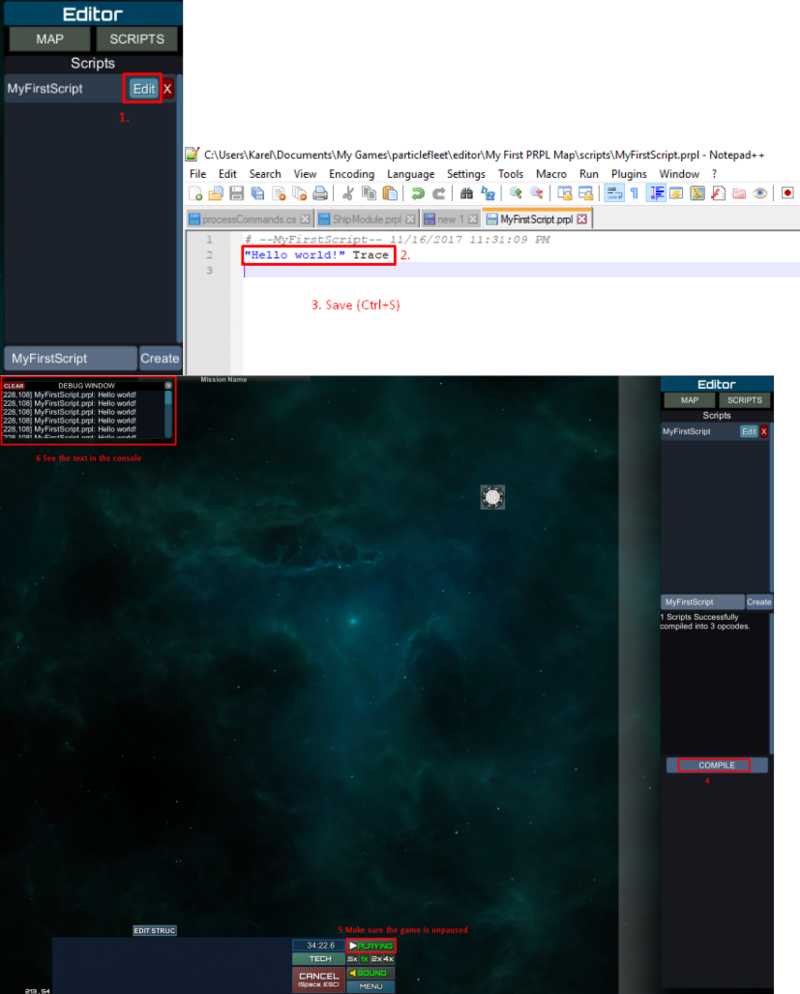
To recapitulate, in the first screenshot we create a new PRPL core on the map, in the second screenshot we create and compile a new script, and in the third screenshot we add the new scritp to the core.
Adding commands into the script
You can notice the script doesn't do anything yet. Let's fix that. Go back into the scripts tab and hit “Edit” on your script. For now just write
"Hello world!" Trace
into the text file and save it. Finally, go back into Particle Fleet map editor and hit “Compile” again. After you unpause the game, you should see the console at the top beign spammed by the “Hello world!” message.
If you don't want the message to be spammed so much, change the code to
once
    "Hello world!" Trace
endonce
Which will execute the code only once after compilation. Hitting the “Compile” button will reload the script files, which you need to do manually every time you make a change to your script. Also make sure you save your file before you compile. Now let's finish the setup for the best coding experience.
Setting up the text editor
This step is entirely optional, but can make it much easier to write scripts. Essentially, Notepad++ is a common text editor for writing in unusual languages, and there's an easy way to get it to recognise PRPL.
You may have seen a different text editor when editing the script, and almost definitely you didn't see the “Hello world!” text colored blue like that. That is called syntax highlighting and is very useful to quickly determine the type of command by color.
To set it up like this, first download the Notepad++ editor from their website and install it. After that, make sure that Notepad++ is the default editor for .prpl files. Just create an empty file named “abc.prpl” anywhere and right-click it -> Properties -> General -> Opens with … -> Change -> Select Notepad++ -> OK. After that, your prpl scripts should open in Notepad++ when you click “Edit” in the map editor.
Next, let's set up the syntax highlighter, because we like pretty colors. Go here and download the prpl-syntax.xml attachment file anywhere. Next, open your Notepad++ and go to Language -> Define your language -> Import -> (select the downloaded prpl-syntax.xml file) -> Open -> (close the language window). It should then change the highlighting of the file. If not, try restarting Notepad++ or selecting the language manually from the Language menu.
<html></html>
How does PRPL work - the fundamentals
As we have seen, you can create scripts which you can in turn add to PRPL cores. The same script can be added to multiple cores, and a single core can have multiple scripts (even the same script multiple times). Every frame (there are 30 frames per second) all scripts in all cores are executed - the game runs the commands of every script in every core.
Basic terms - command, value and stack
The 3 most vitals things are commands, values and the stack. Your code is always composed from the sequence of commands. In our first example, we saw 2 commands: “Hello world!” and Trace. Commands are always executed in the order they are written in the file, unless you alter the execution order by adding special flow control commands - for example the once and endonce commands create a block that will be executed only once, and the program will skip the commands in the block on the following executions.
The most common thing commands do is take/put values from/on the stack. There are 4 types of values:
- string: any text, for example: “abc”, “PRPL is fun” or “” (an empty string)
- int: a whole number (integer), for example: 1, 5, 42, -86, 0
- float: a real number, for example: 3.5, -8.6, 5.0 (a float 5.0 is techically different from an int 5)
- list: a list of several values. We will cover lists much later in this tutorial.
For example, the “Hello world!” command will put the string value “Hello world!” on the stack, whereas the Trace command will take a value from the stack and write it to the debugger console.
Lastly, the stack is a place where you can store values. Imagine the stack as a bunch of values literally stacked on top of each other. New values are always added to the top, and commands always take values from the top as well. The stack can hold an arbitrary amount of values (Well, limited by RAM of course, but it could handle milions of values with ease).
In summary, the programs consists of commands that will be executed in a sequence (= in the same order they are writen in the script file). Each commands can take or put (or both) values on or from top of the stack, as well as do other things.
Code snippets with visual representation
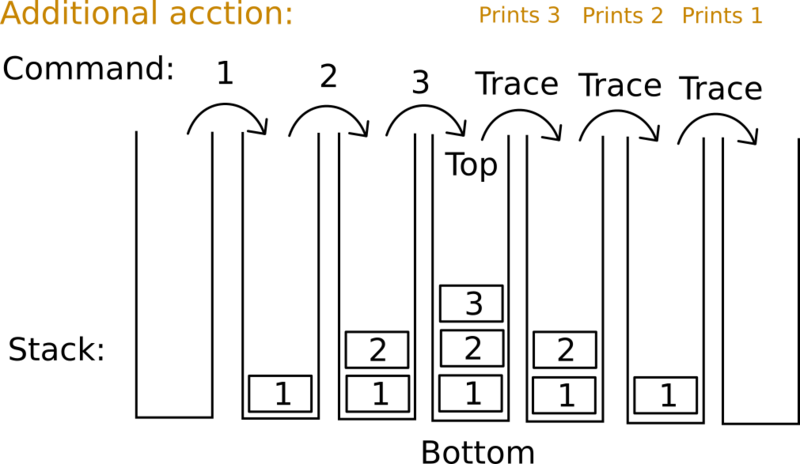
Let's take a look at some examples with images of how the stack behaves. For example if we write
1 2 3 Trace Trace Trace
We will see 3 printed, then 2 and then 1. Why? Let's take a look:
Throughout the execution, there is only one stack, but I drew the stack 7 times to show the changes in it as the commands are executed. Since 3 was put last on the stack, it will be on top when the the first Trace reads it and prints it into the console, therefore 3 will be printed first.
PRPL of course has normal math functions like add (plus), sub (minus), min, max, etc. The way they work is they take their arguments from the stack, and then put the results back on the stack. Examples with some ASCII art:
5 7 add Trace #prints 12

    5     7    add   Trace
| |   | |   |7|   |  |   | |
| |   |5|   |5|   |12|   | |
===   ===   ===   ====   ===


8 6 sub 5 mul #prints 10

    8     6    sub    5    mul   Trace
| |   | |   |6|   | |   |5|   |  |   | |
| |   |8|   |8|   |2|   |2|   |10|   | |
===   ===   ===   ===   ===   ====   ===


8 9 5 min max Trace #prints 8

    8     6    5    min   max   Trace
| |   | |   | |   |5|   | |   | |   | |
| |   | |   |9|   |9|   |5|   | |   | |
| |   |8|   |8|   |8|   |8|   |8|   | |
===   ===   ===   ===   ===   ===   ===
The command notation
Since there is a lot of commands, an easy way to quickly covney what valued does the command take from the stack and what values does it put back is to use a special notaion. It looks something like this: [ input1 input2 input3 - output1 output2 output3 ]. the individual inputs and outputs are replaced with the data type of the particualr input/output.
For example, the “add” command has notation [ number number - number ] since it takes 2 numbers from the stack and puts one number on the stack in return (the addition of the 2 nubmers consumed). Trace has notation [ anything - ] since it accepts one value of any time and doesn't put anything on the stack.
<html></html>
First usefull unit - a floodgate
Let's make our first useful unit that will create and destroy few tiles of land in a row, so that particles can gather behind the land while it is up, and then all be released when the land is destroyed. First, we will need 3 new commands:
- Delay [ int - ]: Halts the script execution for X frames (1 second = 30 frames)
- GetCorrentCoords [ - int int ]: Puts the coordinates of the current script on top of the stack (y on top of x)
- SetLand [ int int int - ]: Sets land height at the target coordinates
You can look the commands up in the PRPL reference for more info, although some commands don't have pages there yet.
So how will our program work again? Simple: we set land at the current coordinates of the PRPL core that is running the script, then we wait for a bit, and then we remove the land again. Code:
CurrentCoords 2 sub 1 SetLand
CurrentCoords 1 sub 1 SetLand
CurrentCoords 1 SetLand
CurrentCoords 1 add 1 SetLand
CurrentCoords 2 add 1 SetLand

90 Delay #Sleep for 3 second

#destroy the land the land
CurrentCoords 2 sub 0 SetLand
CurrentCoords 1 sub 0 SetLand
CurrentCoords 0 SetLand
CurrentCoords 1 add 0 SetLand
CurrentCoords 2 add 0 SetLand

90 Delay #Sleep for 3 second

#                     #sets land at (x, y-2) to 1
CurrentCoords   2    sub      1    SetLand
| |         | |   |2|   |   |   | 1 |   | |
| |         |y|   |y|   |y-2|   |y-2|   | |
| |         |x|   |x|   | x |   | x |   | |
===         ===   ===   =====   =====   ===
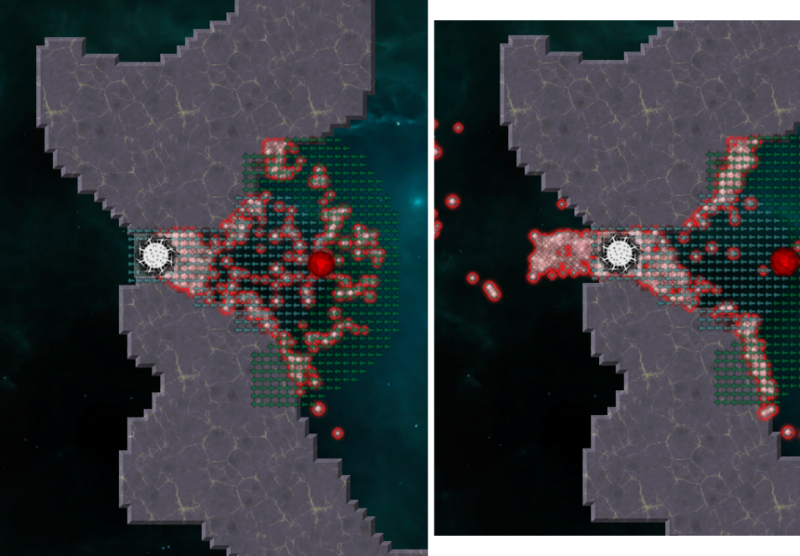
How it looks:
You can barely see the land being created and destroyed because of the image, but hey, at least it's something.


